Tuesday, August 31, 2010

Mini Project #1: Pink Bathroom

Since this bathroom was obviously wayyyy too pink and retro girlie, something had to be done. While originally we thought the bathroom was going to get renovated in the fall, since the kitchen project took longer than expected (as kitchen projects usually do), we decided to take the bare minimum approach to the pink bathroom, and focus our attention on the kitchen for now.

Before: Floral wallpaper, shower curtain and Pink everywhere!
We had some out of town guests coming in at the end of July, so we took that opportunity to get our rears into gear and get something done about the bathroom. On the to do list:

  1. Reattach some loose tile on the floor
  2. Replace the pink toilet seat (that gave you a wild ride if you sat on it just right!)
  3. Remove the wallpaper
  4. Replace the light fixtures & switches (including a built-in "night-light")
  5. Paint the walls
  6. Decorate!
We got most everything done before our guests arrived (with only minutes to spare! haha) and now just need to finish decorating (this will fully happen much later - after major renovations!). Here are some pictures to chronicle the work...

The old light fixtures - two bulbs with large cylindrical covers on each end.


The room looks smaller without the big mirror. Scraping the wallpaper glue off and putting in new switches.


Wallpaper off, Cleaning & new Light fixtures (left)
Final pictures (with some decorations) to come!

Monday, August 30, 2010

Some quirky features about the house

You never really know what you're getting until you get into a house. So there are always things that make you go, "Really?" once you start to live in it. Here's some of the things that we found:

  • There is a "window" from the kitchen into the dining room, complete with "shutters"!

  • The light in the middle of the kitchen (pictured above) is so bright, that when you stand under it, it feels like you're in a tanning bed! (We call it the sun!) This is also the result of 4 - 100W bulbs - which were also in all the receptacles all over the house, heating us up.
  • The shower head holder in the master bath was mounted to the wall, at knee height! (After one week of showering with one hand, this became first priority to fix!)
  • There are lots and lots of switches for pretty much every light in the house - multiple ways to turn the lights off and on everywhere. Except the dining room - which has only one way to turn the light on, and it isn't in the place that even makes the most sense (from the kitchen).
  • Cable and telephone lines were threaded all around the house, through windows, walls, A/C units and more, leaving long lines of cable everywhere on the first floor. Since we don't get cable now, we don't really need them either! The previous owners, however, must have had a phone and TV in every room!
  • One other quirky thing about the phone - the owners had "ringers" installed on every level, so even though the phone was on the middle floor, it "rang" up in our bedroom (and quite loudly). For the first month, our phone was literally ringing off the hook, and we hadn't even told anyone our number yet - look out telemarketers!

Sunday, August 29, 2010

Starting the Renovations...

So pretty much immediately after we signed the papers to close on the house, we packed up our "truck" with cleaning and painting supplies and headed over to the house to start surveying and fixing the mess! In the first two weeks, before we moved in, we managed to paint every room in the house except the kitchen, dining room, family room and laundry room, due to pending renovations.

One of the first "demolition" items was taking down the wood paneling wall in the family room. For some reason, the previous owners had screwed in hooks and bars (exercise stuff?) all over the door inside the family room, so along with the paneled wall came off all of the trim. It was a good excuse for Robbie to get a crowbar, and then he just went to town! (More about the continuing tool escapade later!)


Another thing that was to go were the masses of curtains, everywhere! Those were actually harder to get out of the wall then the wood paneling, and some took the wall with them!

A "gift" from the owners! The gold chair on the right actually plugs into the wall!
We found a lot of "gifts" left from the owners, and are continuing to find them, actually. One of the best was an electric knife still in its original packaging, and actually, probably better than the one I have! (Some of the worst were dirty socks and rags in the laundry room! Eww!)

Monday, August 23, 2010

Starting Pieces - Third Floor

Since our house is a "split" or "multi" level design, just a few steps brings us to another nook of the house!

Walking up the stairs from the living room to the top floor landing
Take a left and you enter the smallest bedroom, facing the street
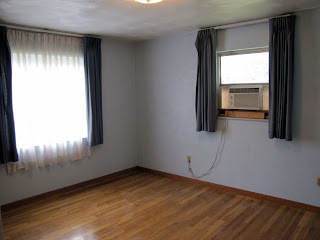
Go straight and you enter the mid-size bedroom, complete with half a window and makeshift A/C unit
Enter the master bedroom - plenty of space, and nice closets! Also half a window though! :)
This is the master bath, attached to our bedroom (More on the shower to come!)
Other than the kitchen, the biggest part of getting the house ready to live in was cleaning everything. No one had really lived in the house for a year while it was on the market, and before that it seemed like an elderly couple lived there and couldn't do much of anything to take care of it. This is also why everything looked like it hadn't been touched or updated since 1970!

Last, but certainly not least, is the room that everyone talks about - the pink bathroom!

Everything, from the floor to the walls to the tub to the toilet is pink!
Robbie said that he didn't feel like a man when he walked into this room, so we knew something had to be done! We also soon found out that the toilet seat wasn't quite attached to the toilet, so if you weren't careful - whoosh - you went for a little ride right off it!

Wednesday, August 18, 2010

Getting ready for Home Improvement #1: Assessment of Skill

This is gleaned from the past 2 months of experience. For any project at home one must begin with him or herself- how much do you really know about home improvement? Can you do it yourself, etc? What skills do you have? Do you even know how to hold a hammer? (I find that many of my students, guys included, do not know the basic know-how of tools. Sad.)

Personally I gleaned a lot of different skills over the years: maintenance at various campgrounds in high school, working with a construction company in college, and doing a lot of things at my parents home. Roofing, insulation, drywall, and painting are things that I know. A few things scare me- like electricity and plumbing. Providentially there are many people in our church community that know how to mud drywall, handle electricity, and other things that are willing to share their knowledge with me. So while my skills are limited, the skill knowledge and ability of our larger community is not.

Also are you willing to learn?

Understanding what you can do yourself along with the availability of skilled friends and family go a long way in determining what you can and cannot do on your house. (It directly affects your budget. Amazingly 40% of your costs will be labor and installation.)

One last note. Recognize that you are going to mess up. Consider that if you wired the ceiling boxes wrongly, then you will have to remove the drywall to fix it. Learning means making a mess, is doing it yourself worth the mess? (For us the answer is yes. As long as it is a small mess.)

Monday, August 16, 2010

Why Churchill?

This past school year was hectic for both Jennifer and I. I was teaching full time and taking classes part time at the Reformed Presbyterian Theological Seminary. Thus, I was gone 2 nights a week taking classes. Jen, on the other hand, worked full time for Westinghouse and took classes full time from CALU. So when March rolled around, Jen received her masters degree and had nothing to do those nights while I was away. She took to looking at home properties since the first time home buyer's tax credit was a huge incentive for buying a house. In the next 4 weeks we looked at some 30 homes, I am not exaggerating, all over the Eastern suburbs, and we settled on the house we have now for a few reasons wrapped around the idea of Location, Location, Location:
  1. Churchill is close to the school where I teach at, the church we worship at, and the seminary I attend. (My bike commute to Trinity is either 1.6, 1.8, 2.1 miles depending on the route I take!) It is a community we spend a lot of time in, so why not live here?
  2. Friends live in our community. Our community group has close to 30 people coming out. There are three young couples that we are close to, many of my colleagues are nearby, and it is family friendly.
  3. In 10 minutes we can be downtown in the city- if traffic is good. Many of our friends live in the city, thus again we are more central to our community. (*10 minutes is subject to weather, traffic, and other conditions.)
We looked at houses in Monroeville, Murrysville, Forest Hills, and Churchill. A theology of place guided our search. The biggest downside is Jen has a long commute, even though it is the same length as when we rented in Murrysville.

Sunday, August 15, 2010

The biggest project: Kitchen (Before)

The kitchen really scared me when we first walked through the house, but Robbie assured me - we'll fix it all up! So here is what we started with!

Everything (except for the fridge - see below) is original with the house - 1965!
The fridge was pretty much the only thing that wasn't original in the kitchen, but the only reason we knew this is because there was an even older fridge (think vintage 1965 Westinghouse fridge with turquoise interior) in the garage!

The turquoise range (and convection oven) is the standout piece for the room :)

You might not be able to tell, but the floor is an old tile that is discolored and coming up at different parts, the countertop was white laminate with gold flecks/dots, and the ceiling was the kind of tile you might see at an older school building (holes in it), also discolored.

Wallpaper fun! (or not!) Plus, the light that's as bright as the sun, and the "window" from the kitchen to the dining room!
The peekaboo window into the dining room inspired us to turn that wall into a bar/island area. Even better was the "shutters" that came along with it!

Home improvement, here we come!

Wednesday, August 11, 2010

Starting Pieces - Second Floor

The kitchen needs the most work, but the rest of this floor is in great shape! (Kitchen pictures to follow!)

Our Living Room - with an interesting Iron art piece!
A view of the Living Room from the other side...
A look from the living room in to the Dining Room and out onto the back patio.

One nice feature of the living room - fireplace!

Tuesday, August 3, 2010

The Starting Pieces - First Floor

When we walked into the house after we closed, this is basically what it looked like!

First floor: Family Room, Laundry Room, Den & 1/2 Bath

This is the family room - but there is no more wood paneling!
(Yes, the walls are pink!)

Robbie's Den (in Mint Green)


The laundry room! (Notice the "lifted" washer and dryer -  Jen needs a step stool to get the clothes in & out!)


This bathroom was such a bright shade of yellow that we couldn't tell what shade the toilet was!
(Alas, it too was yellow - along with the sink!)


Our New Home!

Welcome!

As many of you know, we recently purchased a house! As we journey through the joys of home ownership, we'll try to keep you up to date on what's going on at the Schmidtberger's place! Be sure to check out the before and after photos!