Monday, September 20, 2010

Kitchen Demolition: Part 3 - The Ceiling

With the wall between the kitchen and dining room demolished, we turned our attention to...the ceiling!

This is probably the best shot of the ceiling - tile that you might find in an old school room, but it wasn't white anymore!
We were advised to try to take down the tile ceiling to see what was under it, in hopes that we could still use what was underneath without putting another layer (of drywall) on top.


But, as you can see, it was quite difficult to get the tile off the ceiling. Robbie was able to take off the easy pieces pretty quickly, but there remained lots of pieces of the tile that were glued to the plaster ceiling.

So after a couple days of scraping...


and scraping...

and scraping!! ...

We got a little testy!  :)

So we had one of our friends come over to look and see if it was "good enough", and determined that the remaining tile pieces were so stuck onto the ceiling, we better just put up some drywall.

Oh well, at least it was entertaining!!  :)

Saturday, September 18, 2010

Major Project: Kitchen Demolition - Part 2

After the plaster and drywall was taken down, the next task was the studs. We had several people come in and tell us that it wasn't a supporting wall, but that doesn't always make you feel any better when you consider that one wrong move could send your new house into shambles!

But with some testing, we saw it was ok, and Robbie got out the circular saw to start taking down the studs!

Well - I guess it turned out ok, since the ceiling is still there!
We left a lot of the electrical work until we could get someone to help us with the wiring. The previous owners had so much going on in the house - there were outlets and switches everywhere!

We also decided to widen our doorway, so you can see part of the wall is missing all the way to the floor.
It's starting to open up! After some help from our electrical buddies, we were able to take down all the studs and just leave some wires hanging for lights we'd install later.

You can also see in this picture that we removed the countertop - fun!
Now the room is really starting to open up since you can see completely from one room to the other. You can also tell that the fridge changed places, moving to its temporary home in the dining room. We found lots more layers of wallpaper behind it! However, since we taped off the entrance to the dining room, it was a little challenging to get to the food every meal as we trailed through the demolition area!

Thursday, September 16, 2010

Major Project: Kitchen Demolition - Part 1

About one month after we moved in, we started demolition in the kitchen area. Our grand plans were to open up the kitchen into the dining room by removing half of a wall between those rooms.

This little "window" from the kitchen to the dining room inspired us to take down half of the wall!

Since Robbie had the summer off from teaching, one Monday he just went to work on demolishing the wall. He also was able to get some help from one of his students! When I got home from work that day, here's what i found:

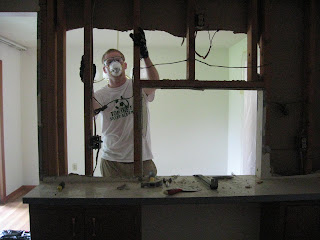
One side of the wall is torn off, showing the studs. Yes, that's Robbie with the face mask!
"I'm so strong, I can tear down walls with my bare hands!"

"Look honey! I'm taking apart the wall!"
Yay! We can see through the wall!
While fun, demolition is dirty and dusty business. We put up plastic tarps in the doorways of the dining room and kitchen to try to keep the dust from getting too far into the house, but it still got tracked everywhere. But before things get better, they have to get worse!

Saturday, September 4, 2010

Getting Ready for Home Improvement #2: A List

Being in Pittsburgh everyone and their cousin works for Westinghouse or some other engineering firm, so I hear the label "Project Manager" a lot. Well when it comes to home improvements, the improver is the manager. People come over and help out, I listen to their advice and end up getting shocked by an outlet. Improvers manage their own property and seek to make it better. So with that idea in mind we had to come up with a plan on how to renovate our kitchen. (Warning this gets specific.)
  1. Remove the ugly wallpaper - it tore off lovely and we used a steamer to loosen the glue. Good friend Derek Bates suggest fabric softener mixed with water. It worked just as well and better on occasion.
  2. Demolition: take out 1/2 a wall and convert it into a 40 inch bar wall. This will require moving wiring and removing bulkheads, thus exposing the attic.
  3. Electrical work - install new lights over bar
  4. Demolition - bye, bye cabinets with countertop, sink, stove, and dishwasher.
  5. Ceiling work - install new drywall ceiling after removing the tile and scraping off hardened glue.
  6. Electrical work - install recess lighting that replaces the old ones
  7. Mudding and prep work for paint - gotta have a flat, smooth surface
  8. Painting ceiling, walls, and anything else.
  9. Flooring - tear up the old stuff and down with the new
  10. Cabinet installation (which must be delivered) along with all the bells and whistles
  11. Appliances delivered and installed
  12. Countertop templated, ordered, and installed
I feel like I am missing something...............